Posted on

Decorative Aluminum Balusters: Baroque, Pot Belly, and Flat Bar Styles for Custom Decks

Black decorative basket twist aluminum balusters installed in a deck railing with lush green garden in the background

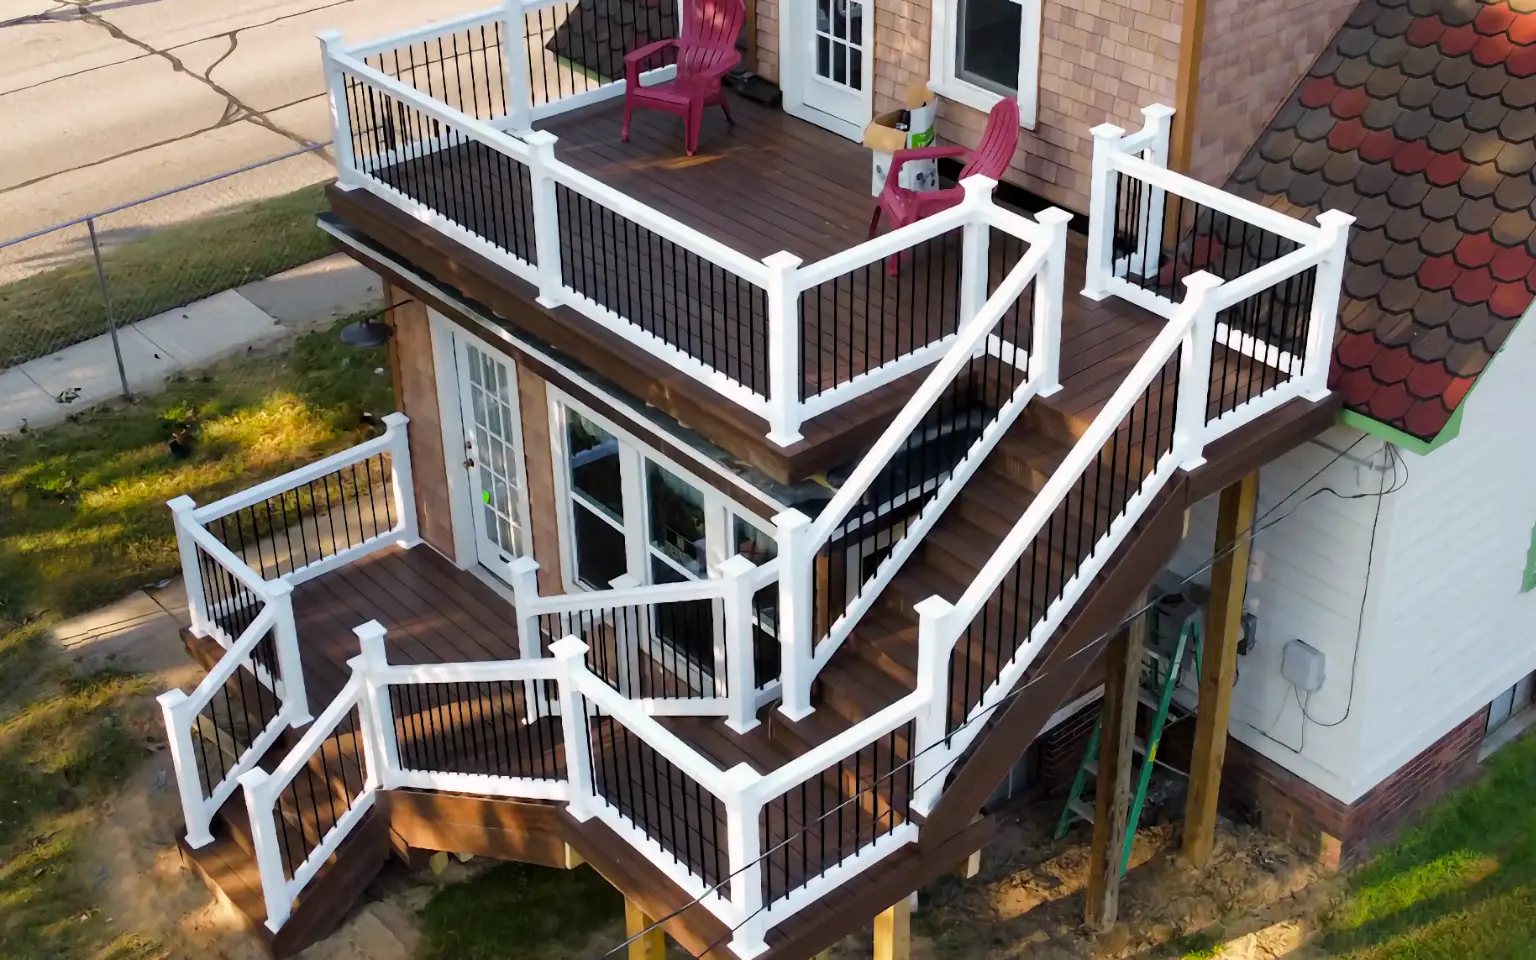
Standard round and square aluminum balusters handle 90% of deck builds. But when a client wants something different — a railing that makes the deck feel custom — decorative aluminum balusters deliver the look without sacrificing the durability and low maintenance that make aluminum the preferred material for professional deck builders.

The Deck Barn carries three decorative profiles, each with a distinct character. Here’s what they look like, how they install, and when to recommend them.

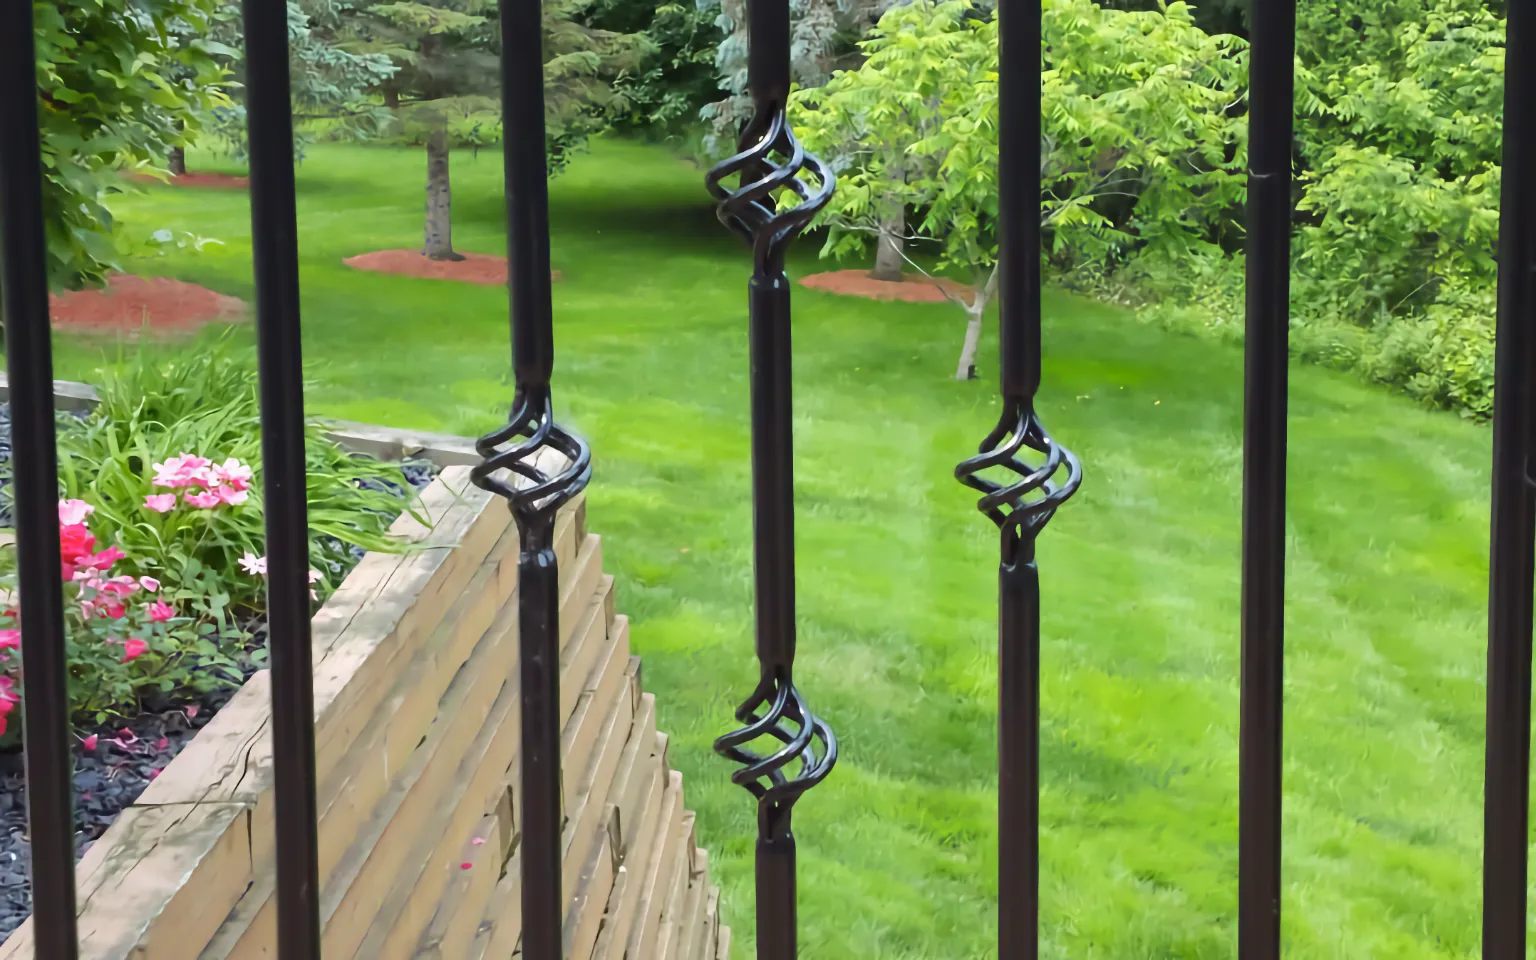
Baroque (Wavy) Balusters

The Baroque baluster has an S-curve profile that adds visual movement to the railing line. Instead of straight vertical lines, the wavy shape creates rhythm and shadow play that stands out, especially on long railing runs where straight balusters can feel monotonous.

Specs:

  • Face-mount installation style
  • Available in 32-1/4″ and 39″ lengths
  • Price: $5.83 – $8.33/piece
  • Rating: 5.00/5 stars

Best for: Traditional homes, wraparound porches, and clients who want a wrought-iron look without the weight or rust. The Baroque profile pairs well with vinyl railing systems and painted wood rails where a classic, ornamental character is the goal.

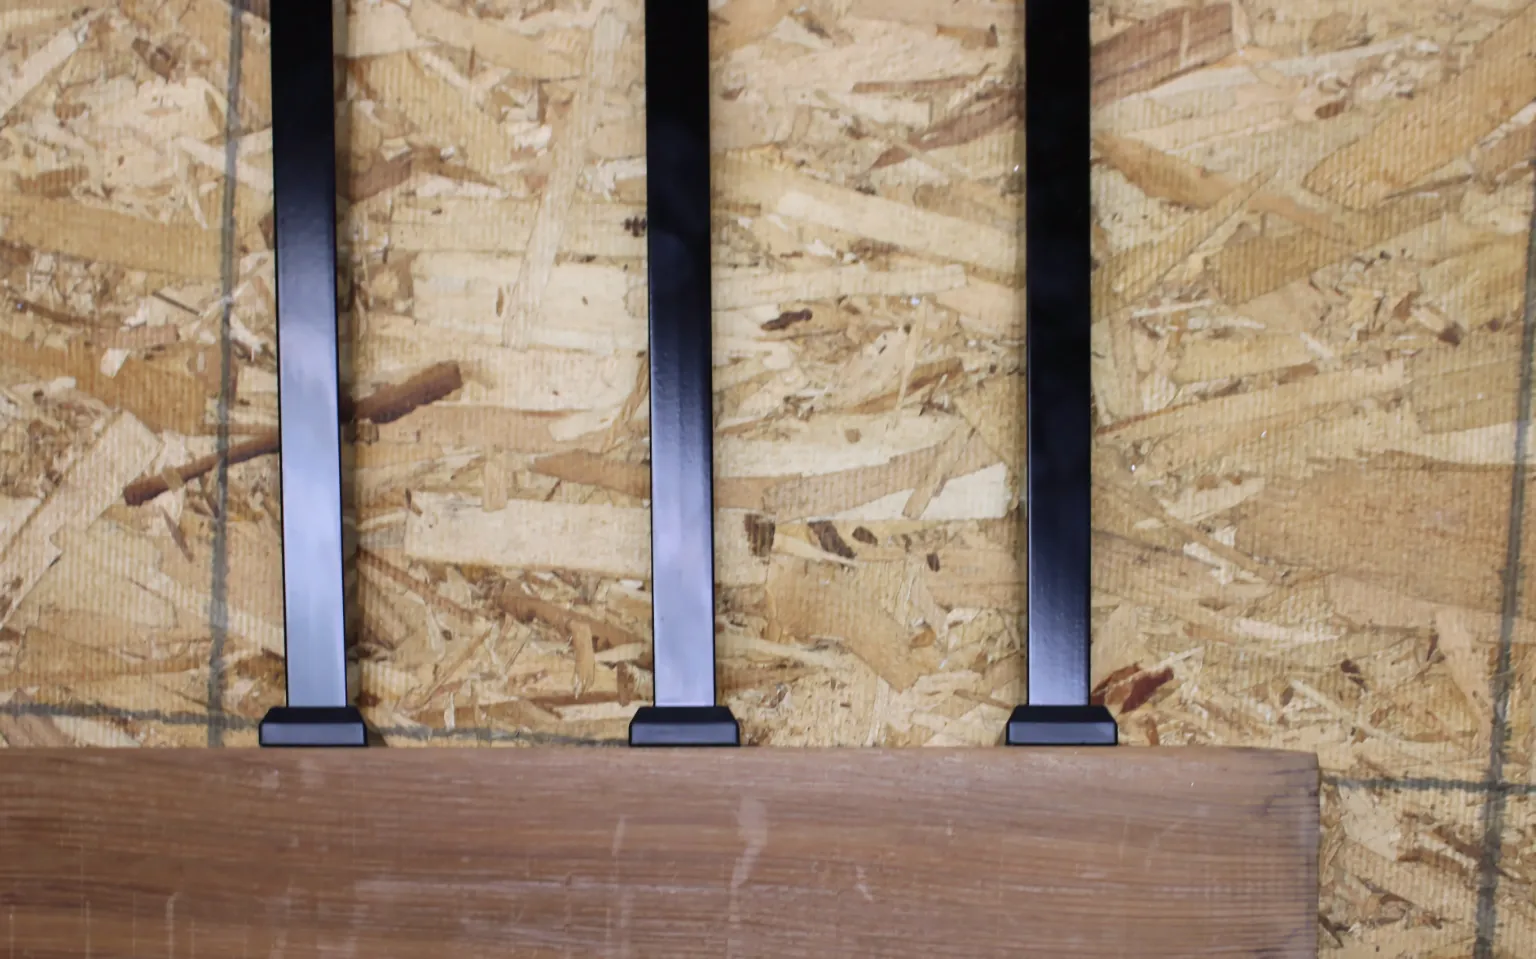
Installation note: Baroque balusters use a face-mount system rather than top/bottom connectors. They attach directly to the face of the top and bottom rail. This changes the installation approach compared to standard balusters — plan your rail layout accordingly.

Pot Belly Balusters

The Pot Belly baluster features a bulged midsection that adds a sculptural element to each baluster. The wider center draws the eye and creates a pattern of repeating shapes along the railing run.

Specs:

  • Price: $4.99 – $6.99/piece
  • Rating: 5.00/5 stars

Best for: Colonial and traditional home styles where the client wants more detail than a plain straight baluster. The pot belly shape echoes turned wood spindles but with aluminum’s weather resistance and zero maintenance. Recommend these for clients who love the look of wood turnings but don’t want the upkeep.

Flat Bar Balusters

The Flat Bar baluster has a wide, flat cross-section instead of a round or square profile. This creates a bold, modern look with strong vertical lines and more visual presence than standard profiles.

Specs:

  • Face-mount installation style
  • Black finish
  • Available in custom sizes from 24″ to 48″
  • Price: $4.33 – $11.33/piece
  • Rating: 5.00/5 stars

Best for: Contemporary and modern home designs where the railing is a design feature, not just a safety requirement. Flat bars create a more enclosed, defined railing plane compared to round or square profiles. They work well on rooftop decks, modern additions, and commercial-adjacent residential projects.

Installation note: Like the Baroque, flat bar balusters use face-mount installation. The flat profile means orientation matters — all balusters need to face the same direction for a clean look.

Mixing Decorative and Standard Balusters

Some builders create visual interest by mixing profiles within a railing run. Common approaches:

  • Accent pattern: One decorative baluster every 4th or 5th position, with standard round balusters between
  • Section differentiation: Decorative balusters on the front-facing railing, standard on the sides
  • Stair accent: Decorative balusters on the main deck level, standard round on the stair sections for easier installation

When mixing, confirm that spacing still meets the 4″ sphere rule at every point. Decorative profiles can be wider than standard balusters, which may affect your gap calculations. See our baluster spacing guide for the math.

Pricing Context

Decorative balusters cost more per piece than standard profiles, but the material upcharge on a full railing run is modest compared to the perceived value they add to the finished project:

Profile Per Piece Cost for 8-foot section (~21 balusters)
Standard Round From $1.43 ~$30
Baroque From $5.83 ~$122
Pot Belly From $4.99 ~$105
Flat Bar From $4.33 ~$91

The difference between standard and decorative on an 8-foot section is $60-$90 in materials. For the client, that translates to a noticeable design upgrade at a fraction of the total deck cost. For the builder, it’s an easy upsell that increases project value.

Same Aluminum, Same Durability

All decorative profiles share the same core advantages as standard aluminum balusters: powder-coated finish, zero maintenance, no rot or rust, and consistent performance in any climate. The shape is different, but the material is the same.

Shop All Aluminum Balusters | Request a Quote

Posted on

How Many Balusters Do I Need? Spacing Calculator and Code-Compliant Quantities

Aerial drone view of a multi-level elevated deck with white vinyl railing black aluminum balusters and stairway on a residential home

Getting the baluster count right before you order saves time, money, and a second trip to the supplier. Too few and you’re waiting on a reorder. Too many and you’ve got inventory sitting in the truck. Since The Deck Barn sells aluminum balusters by the piece, you can order the exact quantity — but you need to know the number first.

Here’s how to calculate it, plus a ready-to-use reference table for common railing lengths.

The Code Requirement

The International Residential Code (IRC) Section R312.1.3 states that the opening between balusters shall not allow passage of a 4-inch sphere. This means the clear gap between any two adjacent balusters cannot exceed 3-15/16″ (just under 4 inches).

Most builders target a clear gap of 3.5″ to 3.75″ to stay comfortably within code while keeping a consistent, clean look.

The Formula

For standard 3/4″ aluminum balusters with a target gap of 3.5″:

  1. Calculate on-center spacing: Baluster width (0.75″) + desired gap (3.5″) = 4.25″ on-center
  2. Divide rail opening by on-center spacing: Rail length ÷ 4.25 = approximate number of spaces
  3. Number of balusters = number of spaces – 1 (the posts create the first and last boundary)
  4. Round up to the nearest whole number
  5. Recalculate exact gap: (Rail length – (balusters × 0.75″)) ÷ (balusters + 1) = actual gap

Important: The gap between the post face and the first (and last) baluster also counts and must be under 4″. Include this in your layout.

Quick Reference Table

For 3/4″ aluminum balusters with approximately 3.5″ clear spacing:

Rail Length Balusters Needed Connectors Needed Actual Gap
3 feet (36″) 8 16 3.38″
4 feet (48″) 10 20 3.68″
5 feet (60″) 13 26 3.55″
6 feet (72″) 15 30 3.53″
7 feet (84″) 18 36 3.71″
8 feet (96″) 21 42 3.55″
10 feet (120″) 26 52 3.57″

Note: These counts assume the rail spans between two posts. If your railing has corner posts or intermediate posts, calculate each section separately.

Calculating for a Full Deck

Most decks have multiple railing sections. Here’s the process:

  1. Measure each section separately — the distance between post faces
  2. Calculate balusters per section using the formula above
  3. Add up all sections for your total baluster count
  4. Add stair sections separately — stair rail lengths are measured along the slope
  5. Order connectors: total balusters × 2 (level connectors for level sections, stair connectors for stair sections)

Stair Sections

Stair railing uses the same 4″ sphere rule, but the balusters are measured along the slope of the stair rail, not the horizontal run. Measure the rail length from post to post along the stair angle.

Use the same spacing formula, but remember:

  • Stair balusters are typically shorter than level balusters
  • You need stair connectors, not level connectors
  • The bottom of each baluster will be at a different height relative to the stair treads

How to Order the Right Amount

Once you have your total count:

  1. Add 5% overage for cuts, breakage, or measurement adjustments (aluminum is tough to break, but it’s cheap insurance)
  2. Separate level vs stair connector counts — they are different products
  3. Confirm baluster length: standard lengths are 26″, 32″, 36″, and 42″. Custom lengths from 8″ to 95″ are available for round aluminum balusters

Need help with a specific project? Request a quote and we’ll calculate the materials for your railing layout.

Why Ordering by the Piece Matters

Big-box stores sell balusters in packs of 5, 10, or 20. If your section needs 13 balusters, you’re buying 15 or 20 and eating the extra cost. At The Deck Barn, you order 13 and you get 13. Across a full deck with multiple sections and stair runs, that precision adds up.

Shop Aluminum Balusters | Shop Connectors | Request a Quote

Posted on

Aluminum Baluster Connectors Explained: Flat Shoes, Round Shoes, and Stair Adapters

Black square aluminum balusters installed in a wood rail using baluster connectors on a workbench

Every aluminum baluster needs two connectors — one top, one bottom. Pick the wrong type and the baluster won’t seat, won’t stay plumb, or won’t pass inspection on stairs. Connectors are cheap (most are under $0.50 each), but ordering the wrong ones can cost you a trip back to the supplier and a lost afternoon.

Here’s a breakdown of every connector type The Deck Barn carries, what it fits, and when to use it.

Round Baluster Connectors (Classic / Flat Shoe)

The 3/4″ round baluster connector is the standard connector for round aluminum balusters. It’s a friction-fit plastic shoe with a round opening that accepts the 3/4″ diameter baluster. The flat base sits flush against the rail surface.

Use for: All level (horizontal) railing sections with round balusters

Price: Starting at $0.28/piece

Rating: 4.95/5 stars

These connectors snap over the baluster end and hold it in place inside the drilled rail hole. No adhesive or fasteners needed in most applications — the friction fit combined with the weight of the rail assembly keeps everything locked in.

Stair Connectors (Angled)

The aluminum stair spindle connector is the angled version of the round connector. It’s designed for stair railing sections where the rail follows a 30-35 degree slope.

Use for: All stair railing sections with round balusters

Price: Starting at $0.32/piece

Rating: 4.91/5 stars

The angled base compensates for the slope so the baluster stands vertical while the connector sits flat against the angled rail. Do not use level connectors on stairs — the baluster will lean and the gap between the connector base and rail surface will be visible and non-compliant.

Order stair connectors separately from your level connectors. Count the balusters in your stair sections and order 2 stair connectors per stair baluster (top + bottom).

Square Baluster Connectors (Estate Series)

The Estate series square connector has a square opening sized for 3/4″ square aluminum balusters. The operating principle is the same as the round connector — friction fit into a drilled hole — but the square opening prevents rotation and holds the baluster in its intended orientation.

Use for: All level railing sections with square balusters

Price: $0.35/piece

Rating: 5.00/5 stars

Square connectors are not compatible with round balusters, and round connectors won’t work with square balusters. This is the most common ordering mistake — double-check your baluster profile before ordering connectors.

Designer Connectors (Decorative Round)

The designer baluster connector is a round connector with a more finished, decorative profile. It functions identically to the classic round connector but has a slightly different aesthetic at the rail surface.

Use for: Level railing sections where you want a more polished look at the baluster-to-rail junction

Price: $0.35/piece

Rating: 5.00/5 stars

Designer connectors are interchangeable with classic round connectors in terms of fit. The choice is purely cosmetic.

How Many Connectors Do You Need?

The math is simple:

Total connectors = Total balusters × 2

But you need to order the right type for each section:

Section Type Baluster Profile Connector to Order
Level railing Round Classic round connector × 2 per baluster
Level railing Square Estate square connector × 2 per baluster
Stair railing Round Stair connector × 2 per baluster
Stair railing Square Contact us — square stair connectors may require special ordering

Pro tip: Order 5-10% extra connectors. They’re cheap insurance against cracked or lost pieces on the jobsite. At $0.28-$0.35 each, a few spares add almost nothing to the material cost.

Installation Tips

  • Drill the right hole size: Use a 7/8″ spade or Forstner bit for the connector recess, plus a 1/4″ through-hole for drainage
  • Consistent depth matters: If holes are too shallow, connectors sit proud and create a visible gap. Use a depth stop on your bit.
  • Seat fully before securing rail: Press every connector flush before attaching the rail assembly to posts. A partially seated connector will work loose over time.
  • Check fit before bulk drilling: Test one connector in one hole before drilling the entire run. Different lumber species and moisture levels can affect fit.

For the complete installation process, see our aluminum baluster installation guide.

Order Connectors by the Piece

The Deck Barn sells every connector type individually — no forced bundles. Order the exact count you need for each section of railing. Same-day shipping on orders placed before 3 PM ET.

Shop All Baluster Connectors | Shop Aluminum Balusters | Request a Quote

Posted on

How to Install Aluminum Balusters: Spacing, Connectors, and Tools

Raised pressure-treated wood deck with black aluminum balusters wood railing and stairs leading to a paver patio

Installing aluminum balusters is one of the fastest railing tasks on a deck build — if you’ve got the right connectors and your spacing dialed in. This guide covers the full process from measuring your opening to setting the last baluster, with the tools, math, and code requirements you need to get it right the first time.

Tools and Materials

Tools needed for aluminum baluster installation: cordless drill, speed square, tape measure, and drill bits

Tools:

  • Tape measure
  • Speed square
  • Cordless drill
  • 7/8″ spade or Forstner bit (for connector recesses)
  • 1/4″ drill bit (for drainage holes)
  • Miter saw (for cutting balusters to length if needed)
  • Pencil or marker

Materials:

Step 1: Measure the Rail Opening

Measuring the railing opening between two deck posts

Measure the distance between posts where the railing will be installed. This is the opening that your top and bottom rail lumber will span. Write this measurement down — you’ll use it to calculate baluster quantity and spacing.

If you’re working with vinyl rail kits, the rail length is predetermined by the kit size. Measure to confirm, but the kit dimensions will guide your layout.

Step 2: Calculate Baluster Spacing

Marking baluster spacing on a 2x4 rail with a speed square and pencil

The IRC requires that the gap between balusters shall not allow passage of a 4-inch sphere. In practice, most builders space balusters between 3.5″ and 3.75″ apart (on-center spacing will be wider depending on baluster diameter).

Quick spacing formula:

  1. Subtract baluster width (3/4″ for standard aluminum) from 4″ max gap = 3.25″ clear space maximum
  2. Divide total rail opening by (baluster width + desired gap) to get the number of balusters
  3. Round up to the nearest whole number
  4. Recalculate the exact gap: (rail opening – (number of balusters × baluster width)) ÷ (number of balusters + 1)

For a more detailed breakdown with a ready-to-use reference table, see our baluster spacing calculator guide.

Step 3: Mark and Drill the Bottom Rail

Bottom rail drilled with evenly spaced holes for baluster connectors

Lay out your bottom rail on a flat surface. Starting from one end, mark the center point for each baluster based on your calculated spacing. Use a speed square to transfer marks to the center of the rail.

At each mark, drill a 7/8″ hole approximately 1″ deep using a spade or Forstner bit. This creates the recess for the bottom baluster connector. Then drill through the remaining depth with a 1/4″ bit — this smaller hole provides drainage so water doesn’t pool in the connector pocket.

Pro tip: Drill all bottom rail holes before moving to the top rail. Clamp a depth stop on your 7/8″ bit to keep hole depth consistent across the entire run.

Step 4: Install Connectors

Baluster connectors installed in drilled bottom rail

Place a baluster connector into each hole on the bottom rail. The connector should sit flush with the rail surface. Repeat for the top rail.

Top rail holes also get the 7/8″ recess plus 1/4″ drainage hole. Some builders skip the drainage hole on top rails, but it’s good practice to include it — water finds its way into everything on a deck.

Step 5: Insert Balusters Into the Bottom Rail

Aluminum balusters standing upright in bottom rail connectors

Insert each aluminum baluster into the bottom connector. Work from one end to the other, making sure each baluster seats fully into its connector. Once all balusters are standing in the bottom rail, you’re ready for the top rail.

Step 6: Attach the Top Rail

Top rail being lowered onto aluminum balusters to complete the railing assembly

Place connectors into the top rail holes, then lower the top rail onto the baluster tops. Press firmly to seat all connectors. It helps to have a second person hold one end while you align the other.

For stair sections: Use angled stair connectors instead of level connectors. These accommodate the 30-35 degree slope of stair railings. Standard level connectors will not work on stairs — the baluster will sit at the wrong angle.

Step 7: Secure the Assembly to Posts

Deck builder securing railing assembly to post with a cordless drill
Attaching top rail to deck post from above

Once all balusters are seated in both top and bottom connectors, secure the rail assembly to your posts using your railing system’s mounting hardware. For wood-to-wood connections, railing brackets provide a solid, concealed attachment.

Check a few balusters with a 4″ sphere (a tennis ball works in a pinch) to verify code-compliant spacing. Inspect the full run for any connectors that aren’t fully seated and press them into place.

The Finished Result

Completed deck railing section with aluminum balusters
Finished aluminum baluster stair railing on an outdoor deck

Common Installation Mistakes

  • Using the wrong connector type: Round connectors for round balusters, square for square. They are not interchangeable.
  • Forgetting stair connectors: Level connectors on stair sections look wrong and can fail inspection.
  • Inconsistent hole depth: Shallow holes leave connectors proud of the rail surface. Use a depth stop.
  • Not accounting for post width in spacing: The gap between the post face and the first baluster must also be under 4″.
  • Cutting balusters without deburring: If you cut aluminum balusters to custom length, deburr the cut end with a file so the connector seats properly.

Buying What You Need — No More, No Less

At The Deck Barn, we sell aluminum balusters and connectors by the piece. Order the exact quantity your project requires — no bundles, no minimums, no waste. With same-day shipping on orders placed before 3 PM ET, your materials arrive when you need them.

Shop Aluminum Balusters | Shop Connectors | Request a Quote

Posted on

Round vs Square Aluminum Balusters: How to Choose the Right Profile for Your Deck

Raised composite deck with black aluminum railing round balusters spiral staircase and copper post caps surrounded by flowers and greenery

Aluminum balusters come in two main profiles: round and square. Both meet code, both last, and both look sharp on a finished deck. But they aren’t interchangeable. The profile you choose affects the visual style of the railing, the connector hardware you need, and how the finished product reads from the street.

If you’re speccing aluminum balusters for your next build, here’s how to decide between round and square.

Visual Differences at a Glance

Round aluminum balusters have a 3/4″ diameter and create a traditional, softer look. They’re the most widely used profile in residential deck construction. The curved surface catches light evenly and produces subtle shadow lines that blend into most railing systems without drawing attention.

Square aluminum balusters have a 3/4″ face and create a more contemporary, architectural feel. The flat faces produce sharper shadow lines and a more defined grid pattern. They tend to stand out more visually, which can be a positive or a negative depending on the design intent.

As a general rule: round profiles recede, square profiles assert. Choose round when the railing should complement the view. Choose square when the railing is part of the design statement.

Connector Compatibility

This is where the practical difference matters most on the jobsite.

Round balusters use the standard 3/4″ round baluster connector — a simple friction-fit shoe that snaps over the baluster end and sits flush against the top and bottom rail. These are the most common and least expensive connectors, available starting at $0.28 per piece.

Square balusters require the Estate series square connector, which has a square opening to match the profile. These run about $0.35 per piece. You cannot mix round connectors with square balusters or vice versa — the fit won’t work.

For stair sections, both profiles have dedicated stair connectors that accommodate the rail angle (typically 30-35 degrees). Make sure you order the stair version separately — level connectors don’t adjust.

Which Profile Works With Which Deck Style?

Round balusters pair well with:

  • Vinyl railing systems (the most common combination)
  • Traditional wood rail caps
  • Composite decking with a classic aesthetic
  • Homes with existing round porch or stair balusters

Square balusters pair well with:

  • Aluminum rail systems
  • Modern or contemporary home designs
  • Horizontal deck board patterns
  • Commercial or mixed-use projects

When in doubt, look at the existing architectural lines on the home. Round softens, square sharpens. Match the baluster to the character of the house, not just the deck.

Installation Differences

Both profiles install the same way: drill holes in the top and bottom rail, insert the baluster, and secure with connectors. The tools and process are identical.

The one difference worth noting: square balusters can rotate in the hole if the fit is loose. Round balusters don’t have this issue because rotation doesn’t change their orientation. If you’re using square balusters, make sure connector fit is snug and the baluster is aligned before the railing is fully secured.

For a complete walkthrough, see our aluminum baluster installation guide.

Pricing Comparison

At The Deck Barn, both profiles are competitively priced and sold by the piece:

Profile Starting Price Colors Available Custom Lengths
3/4″ Round $1.43/piece 5 (Black, Bronze, White, Clay, Green) 8″ to 95″
3/4″ Square $2.80/piece 2 (Matte Black, Bronze) Standard lengths

Round balusters offer more color options and custom length flexibility. Square balusters cost more per piece but may be the right call for projects where the modern look justifies the premium.

The Bottom Line

For most residential deck jobs, round aluminum balusters are the default for a reason: lower cost, more color options, universal compatibility, and a look that works on almost any home. Square aluminum balusters earn their place on contemporary builds where the architectural lines call for something sharper.

Both profiles deliver the same durability, weather resistance, and low maintenance that make aluminum the preferred choice for professional deck builders.

Shop Aluminum Balusters | Request a Contractor Quote

Posted on

Aluminum Balusters vs Wood Balusters: What to Recommend to Your Clients

Side by side comparison of wood balusters on a cedar deck railing and black aluminum balusters in white vinyl railing

When designing a residential deck, railing choices have a major impact on safety, durability, maintenance, and overall appearance. Among the most common options are aluminum balusters and traditional wood balusters. Both materials have been widely used in residential construction, and each offers distinct advantages depending on project goals, budget, and long-term expectations.

If you’re comparing aluminum balusters vs wood balusters for your next deck project, understanding performance differences is just as important as appearance.

Durability and Weather Resistance

One of the biggest differences between aluminum balusters and wood balusters is how they perform outdoors over time.

Aluminum balusters are manufactured with powder-coated finishes designed to resist corrosion, fading, and moisture damage. They do not absorb water, will not rot, and are not vulnerable to insect damage. In climates with snow, humidity, or heavy rainfall, aluminum maintains structural integrity with minimal upkeep.

Wood balusters, on the other hand, are naturally vulnerable to the elements. Even pressure-treated lumber can warp, crack, split, or rot over time. In humid or freeze-thaw environments, seasonal expansion and contraction can cause visible movement and long-term deterioration. Proper sealing and staining are required to extend their lifespan.

For long-term durability with minimal intervention, aluminum balusters typically offer an advantage.

Maintenance Requirements

Maintenance is a key factor when evaluating railing systems for clients.

Aluminum balusters require little more than occasional cleaning with soap and water. The powder-coated finish eliminates the need for sanding, staining, or painting. Once installed, the system is largely set-and-forget.

Wood balusters demand consistent maintenance. Depending on climate exposure, they may require sealing or staining every one to three years. Paint can peel, and stains can fade, particularly in direct sunlight. Neglected wood railings can deteriorate quickly and may eventually require partial or full replacement.

For homeowners who prefer low-maintenance outdoor living spaces, aluminum balusters are the clear winner.

Structural Strength and Code Compliance

Both aluminum balusters and wood balusters must meet local building codes regarding spacing, load resistance, and guard height. In the United States, deck railings are generally governed by the International Residential Code (IRC), published by the International Code Council. Builders can also reference deck safety resources from the North American Deck and Railing Association.

Aluminum balusters are engineered products with consistent dimensions and predictable performance. Manufacturers design them to meet load requirements and spacing standards, which can simplify inspections and approvals.

Wood balusters can also meet code, but their performance depends heavily on lumber quality and installation practices. Knots, grain direction, and moisture content can all influence strength. Proper fastening is critical to prevent loosening over time.

In most residential settings, both materials can satisfy code requirements, but aluminum provides more uniform structural reliability.

Aesthetic Considerations

Appearance plays a central role in choosing between aluminum balusters and wood balusters.

Aluminum balusters typically create a clean, modern look with slimmer profiles that preserve sightlines. They are available in several colors—commonly black, bronze, and white—and can complement composite or wood decking systems. Because they are narrow, they help maintain open views, which is especially valuable on elevated decks overlooking landscapes or water. For a closer look at the style options, see our guide to round vs square aluminum balusters.

Wood balusters offer a traditional aesthetic. They pair naturally with all-wood deck structures and can be shaped, routed, or painted for decorative styles. For historic homes or rustic designs, wood railings may better match architectural character.

The decision often comes down to whether you prefer a modern, streamlined appearance or a classic, natural wood look.

Installation Differences

Installation methods vary between the two materials.

Aluminum balusters are often installed using pre-drilled railing systems or connector hardware. Many systems are designed for straightforward installation with consistent spacing, reducing layout guesswork. This can shorten labor time and improve overall uniformity.

Wood balusters are typically toe-nailed or fastened with screws between top and bottom rails. Achieving consistent spacing requires careful measuring and layout. Over time, wood fasteners may loosen due to expansion and contraction.

For a step-by-step walkthrough, check out our aluminum baluster installation guide.

Cost Comparison

Initial material cost can influence the decision.

Wood balusters generally have a lower upfront material cost. However, long-term expenses should be considered. Ongoing staining, sealing, and potential replacement add to the total cost of ownership.

Aluminum balusters may cost more initially but typically incur fewer maintenance expenses. At The Deck Barn, round aluminum balusters start at $1.43 per piece — and because we sell by the piece, you order exactly what you need with no waste. Over a decade or more, aluminum becomes cost-competitive or even more economical due to reduced upkeep and longer lifespan.

Environmental Considerations

Sustainability may also factor into your choice.

Wood is a renewable resource, especially when sourced from responsibly managed forests. However, treated lumber contains preservatives, and repeated staining or sealing introduces additional chemicals over time.

Aluminum is recyclable and often contains recycled content. Its longevity reduces replacement frequency, which can lower overall material consumption across the life of the deck.

Builders interested in environmental impact may wish to review sustainable building guidance from industry groups such as the American Wood Council.

Which Option Is Right for Your Next Build?

When comparing aluminum balusters vs wood balusters, the right choice depends on project priorities.

Choose aluminum balusters if you value:

  • Low maintenance
  • Long-term durability
  • Clean, modern aesthetics
  • Consistent structural performance

Choose wood balusters if you prefer:

  • Traditional styling
  • Lower initial cost
  • Custom shapes or painted finishes
  • A fully wood deck appearance

Both materials can create safe, attractive railings when properly installed according to local building codes.

Shop Aluminum Balusters | Shop Wood Balusters | Request a Quote

Posted on

Why Professional Deck Builders Choose Aluminum Balusters

Composite deck with white vinyl railing gate and black aluminum balusters overlooking a shaded green yard

When it comes to building high-quality decks that last, professional contractors know that the details matter. One of the most important—and most visible—components of any railing system is the baluster. Over the past decade, aluminum balusters have become the preferred choice for professional deck builders who value durability, efficiency, and long-term performance.

The Performance Advantage of Aluminum Balusters

Unlike wood balusters, aluminum balusters will not rot, warp, crack, or split over time. They are engineered to withstand harsh weather conditions, including moisture, UV exposure, and freeze-thaw cycles. For builders working in climates with wide seasonal swings, aluminum provides predictable performance year after year.

From a labor standpoint, aluminum balusters also reduce callbacks. There’s no need for sanding, sealing, staining, or repainting—saving both you and your clients time and money long after the project is complete. Powder-coated finishes maintain their appearance for years, making aluminum balusters a low-maintenance solution that homeowners appreciate.

Why Round Aluminum Balusters Are a Go-To Choice

Among the available styles, round aluminum balusters remain the most popular option for professional deck builders. Their clean, uniform profile works well across a wide range of deck designs—from traditional wood decks to modern composite systems.

Round aluminum balusters are easy to install, especially when paired with pre-drilled railing systems or baluster connectors. Their consistent diameter ensures proper spacing and code compliance, helping builders move faster without sacrificing precision. Whether used vertically or in stair railings, round aluminum balusters provide a streamlined look that complements both wood and composite rails.

Not sure whether round or square is the right call for your next project? See our comparison of round vs square aluminum balusters for a side-by-side breakdown.

Consistency, Code Compliance, and Supply Reliability

Professional builders need materials they can trust. High-quality aluminum balusters are manufactured to tight tolerances, ensuring consistent sizing across large orders. This consistency simplifies installation and helps meet local building code requirements for spacing and load resistance.

Working with a dedicated deck supplies supplier also ensures reliable inventory, color matching, and bulk availability—critical for large or multi-phase projects. When aluminum balusters are readily available in multiple finishes and lengths, builders can standardize their railing systems and reduce jobsite delays.

A Smart Upgrade for Clients—and Your Business

Recommending aluminum balusters positions you as a builder focused on long-term value. Homeowners increasingly recognize the benefits of aluminum railing components, especially when paired with composite decking. Offering round aluminum balusters as a standard or upgrade option can help increase project value while reducing future maintenance concerns.

For professional deck builders, aluminum balusters aren’t just a design choice—they’re a practical, profitable solution that delivers durability, efficiency, and clean aesthetics on every build.

Factory Direct Pricing — Buy Only What You Need

At The Deck Barn, we manufacture our own aluminum balusters under the Dextrusions brand and sell them by the piece — so you order exactly what your project requires. No excess inventory, no big-box markups. With over 6 million balusters sold and same-day shipping on orders placed before 3 PM ET, we keep your jobs moving.

Shop Aluminum Balusters | Request a Contractor Quote